Beginner guide · Updated October 2026
Beginner Woodworking Projects: A Practical First-Build Guide + Free Pencil Holder Plan
Your first project should teach you a few repeatable skills—not require a shop full of machines. This guide helps you pick a realistic build, organize your tools and materials, and avoid common mistakes before making the first cut.
Start here: Choose a small, non-structural project with straight cuts, a clear cut list, and instructions for the tools you actually own. A desktop organizer is often a more manageable first attempt than a chair, ladder, or large cabinet.
Three projects that build useful skills
1. Desk organizer
Practice: marking, square cuts, sanding and simple assembly.
Plan check: Look for a small number of parts, a dimensioned drawing and a stable base. A box-style organizer with no drawers is a sensible first step.
2. Small wooden tray
Practice: laying out parts, aligning edges and applying a finish.
Plan check: Confirm how the base attaches and whether the plan specifies suitable material thickness. If the tray may contact food, choose a finish appropriate to that use.
3. Simple bookend pair
Practice: making matching parts and checking 90-degree corners.
Plan check: Prefer a stable design with a clear fastening method; test balance with a few books before finishing.
The three ideas above are project types, not complete dimensioned plans. The free pencil holder tutorial below provides one complete example with measurements and a drilling layout. Select a reputable, detailed plan for your chosen design before cutting material. For additional ideas, see small woodworking projects.
Free beginner project: a solid-wood pencil holder
Build a simple desk accessory from one rectangular wood block. The five holes hold pencils and slim pens (check your pens against the ⅜-in hole); the finished piece also gives you practice marking a centerline, clamping a workpiece, controlling drilling depth, and sanding edges. No affiliate purchase is needed to use this plan.
Before you start: This is an original, dimensioned example design, not a physically workshop-tested plan. Confirm actual stock dimensions and test the hole diameter and drilling depth on scrap wood. A responsible adult or trained instructor should supervise beginners using power tools.
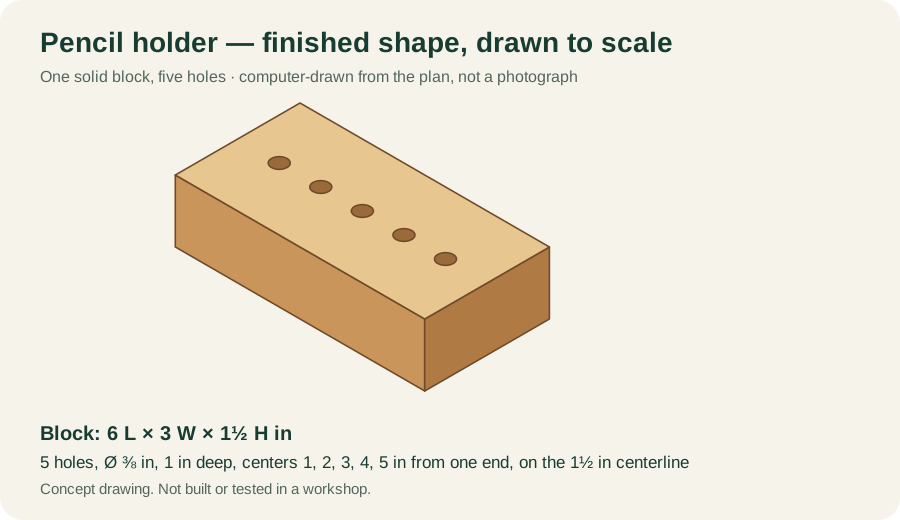
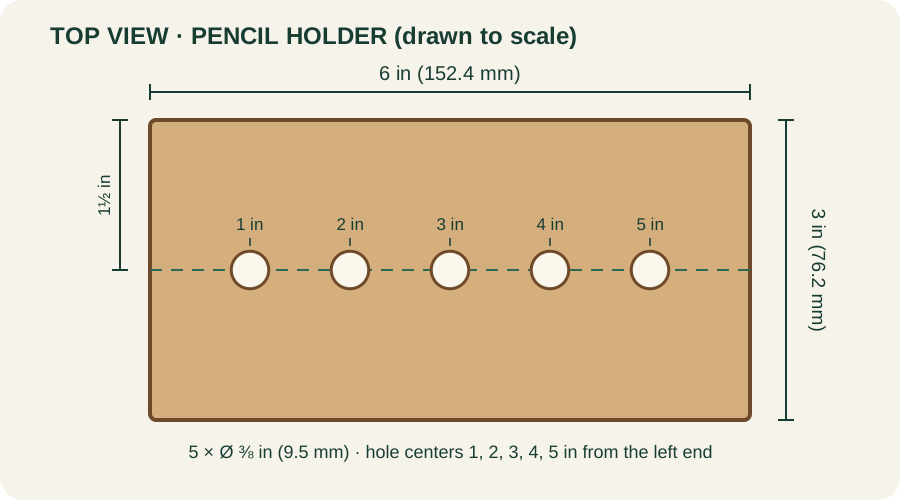
Finished size and hole layout
- Overall block: 6 in long × 3 in wide × 1½ in high (152.4 × 76.2 × 38.1 mm).
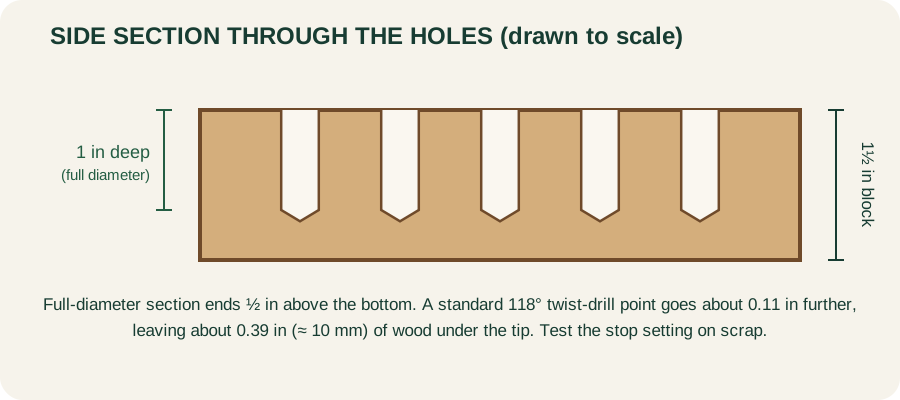
- Five holes: nominal ⅜ in (9.5 mm) diameter, 1 in (25.4 mm) deep, measured from the top surface.
- Hole centers: 1, 2, 3, 4, and 5 in from the left end; each 1½ in from either long edge.
- Wood remaining below each hole: ½ in (12.7 mm) under the full-diameter part of the hole. A standard 118° twist-drill point extends about 0.11 in (≈ 3 mm) further, leaving about ⅜ in (≈ 10 mm) under the tip. Set the depth stop for the tip, and confirm on scrap.
Materials and tools
| Item | Amount | Purpose / selection tip |
|---|---|---|
| Sound, dry, solid wood block | 1 piece, 6 × 3 × 1½ in | Use flat, stable stock free of major cracks or loose knots in drilling locations; ask the lumber supplier to cut it to size if needed. |
| ⅜-in drill bit suited to wood | 1 | Test fit against actual writing instruments. A brad-point bit may help locate holes accurately. |
| Drill with adjustable depth stop | 1 | Follow the tool manufacturer's instructions; use a drill press only if trained to operate it. |
| Clamps and sacrificial backing board | As needed | Secure the block without holding it by hand. |
| Ruler, square, pencil, sandpaper | As needed | Mark hole centers, verify alignment, smooth sharp edges. |
| Optional finish | Small amount | Choose according to the manufacturer's indoor-use instructions; let cure completely before use. |
Build it in seven steps
- Inspect and measure the block. Confirm all three dimensions with a ruler. Reject cracked or unstable material. If the block must be cut, use a suitable cutting method you already know, or obtain it pre-cut.
- Mark the centerline. From a straight long edge, measure 1½ in across the top face and draw a light centerline parallel to the 6-in length.
- Mark five centers. Along that line, place marks 1, 2, 3, 4 and 5 in from the same end. Recheck spacing and edge clearance before drilling.
- Test on scrap. Drill a test hole in comparable scrap wood. Confirm a pencil fits comfortably and that your stop setting accounts for the drill tip, not just the cylindrical part of the hole.
- Clamp securely. Place the block on a stable backing board, secure it with clamps and keep hands clear. Wear eye protection and manage dust as instructed for your tools and material.
- Drill the holes. With the drill perpendicular to the top, work through each center using the tested depth stop. Stop if the bit binds, the block shifts or you are uncertain about the tool's operation.
- Sand and finish. Smooth sharp edges and lightly deburr the hole openings. Remove dust safely. Apply an optional finish following its label, including ventilation and cure time.
Common problems and fixes
- Pencils wobble: A ⅜-in hole may be roomy for some pencils. Test smaller diameters on scrap before committing to the final piece.
- Uneven hole spacing: Re-mark every center from the same end rather than measuring each gap from the previous hole.
- Splintered openings: Use a sharp, wood-appropriate bit, steady support and light sanding; test your drilling method on scrap first.
- Hole breaks through the bottom: Stop immediately; a twist-bit tip extends beyond the nominal shoulder. Set the stop using a test piece of equal thickness.
How to estimate your cost
Use this simple worksheet: wood + consumables + optional finish + any cutting service = project cost. Do not include the full price of reusable tools unless you are specifically budgeting a new workshop. Prices vary by store and region, so compare local quotes rather than relying on a generic online estimate.
Want a second build? Our free small-project guide includes a separate tray design with a cut list and assembly diagrams. For more advanced projects, learn how to evaluate woodworking plans before buying materials.
What tools do you actually need?
| Task | Basic option | What to verify |
|---|---|---|
| Measure and mark | Tape measure or ruler, pencil, square | Clear marks, consistent units, straight reference edges |
| Cut material | Appropriate hand saw or a suitable powered saw | Tool-specific safety instructions, stable work support and safe cutting technique |
| Hold parts | Clamps and a stable work surface | Workpiece cannot shift during the operation |
| Assemble | Drill/driver or hand tools, fasteners or adhesive specified by the plan | Correct fastener sizes, pilot holes and curing instructions |
| Finish | Sandpaper and a finish suited to the project | Ventilation, manufacturer directions and safe dust handling |
Safety first: Wear appropriate eye protection, manage wood dust, secure workpieces and follow the instructions for each tool and finish. Keep hands away from cutting paths. Never bypass guards or improvise unfamiliar powered-tool techniques. Seek in-person instruction for tools you have not used before.
A seven-step first-build workflow
- Pick one plan: Verify the finished dimensions, cut list, assembly sequence and required tools. If any safety-critical step is unclear, find a different plan.
- Check your space: Measure your work surface and make room for cutting, clamping and assembly.
- List the materials: Record actual lumber dimensions, fasteners, adhesive and finishing supplies. Buy a little extra for practice and mistakes.
- Inspect the wood: Look for twists, severe warping and defects that could affect the planned cuts or joints.
- Mark and verify: Use one reference edge, confirm units and check each part before cutting. Practice unfamiliar operations on scrap.
- Dry-fit before fastening: Check alignment, square and fit before glue or permanent fasteners.
- Finish and review: Smooth rough edges, follow finishing-product directions and note what you would improve next time.
Understand measurements before buying wood
Lumber labels do not always describe the board's exact finished dimensions. In the United States, nominal and actual dimensions can differ, especially for surfaced construction lumber. Check the actual thickness and width in the store and compare them with the plan. If a plan calls for a precise thickness, do not substitute material without checking the effect on joinery and final dimensions.
Example: If a plan calls for four identical dividers, cutting each from a separate rough measurement can introduce variation. Mark from a consistent reference and verify the finished pieces together. This improves repeatability without requiring complicated machinery.
Five mistakes worth avoiding
- Choosing a project by photo alone: Attractive photos do not replace measured instructions.
- Buying tools before selecting a project: Start with the plan and determine which tools are essential.
- Ignoring workholding: Unsecured material is a major source of poor results and unsafe situations.
- Skipping a dry fit: Check parts before glue, paint or permanent fastening.
- Expecting a flawless first attempt: Use scrap to learn and choose affordable materials.
Where to find complete plans
Explore free project libraries at Ana White, Kreg, and Instructables. Their individual projects vary; inspect each cut list and instruction set before building. You do not need to purchase a plan collection to learn the basics.
Not sure how to judge a download? Our seven-point guide to choosing woodworking plans explains what to check, including free versus paid options and material costs.
Frequently asked questions
What is the easiest first woodworking project?
A small, non-structural organizer or simple bookend can be approachable when paired with a clear plan and tools you know how to use. Difficulty depends on the specific design.
Can I start without a table saw?
Yes. Many simple projects can be designed around hand tools or other appropriate tools. Choose plans written for your setup rather than improvising risky substitutions.
Should I buy expensive hardwood for my first build?
Not necessarily. Select material appropriate to the project and your budget; practice cuts on offcuts before working with the final pieces.
Do I need paid woodworking plans?
No. Start with one well-documented free plan. Consider paid plans only if a specific project or collection offers something you need and can evaluate.
Next step: build something useful
Try the free pencil holder project above, or choose a plan with a complete cut list and a manageable number of parts. Verify your tools and practice the first operation on scrap. When you are ready for more ideas, explore our small-project guide.